Saturday, August 11, 2012

Pinwheel Danish

Everyone I know right now is having a baby. Seriously. There must have been something in the water about 9 months ago, and I was caught drinking Diet Coke instead. There are babies everywhere!

One of those friends is in my adult Sunday School class at church, and she is having her first baby - a girl. Her nursery theme is kites, butterflies, and other "things that fly." How cute is that? So the baby shower was themed around pinwheels.

Several of us helped with the food, and I couldn't pass on bringing something pinwheel-themed. So I summoned my new trusty friend, Pinterest, for inspiration. And Pinterest didn't let me down!


I combined recipes from two different websites to create these pinwheel pastries: The ingredients and recipe  from Hawaii News Now and the directions on how to put the pinwheels together from Rock Recipes. And then I put my own spin on both recipes by using cherry pie filling for half of the batch instead of jam or lemon curd. I definitely liked the pie filling version the best!

First make sure all of your ingredients are at room temperature. Basically you make a cheesecake mixture for the filling, so you want to be able to cream the ingredients together and make a really smooth, creamy batter.

Next you refrigerate the filling batter while rolling out the puff pastry. I had never used puff pastry before, but I was surprised at how easy it was to work with, and how good the results were. Maybe next time I'll make my own? Hmm, maybe not - the frozen kind worked so well!

Each puff pastry sheet gets cut into 9 squares. I used a pizza cutter and it worked really well to make quick, straight lines.

Then comes the fun part. :-) Again using the pizza cutter, I cut about 2" from the corners toward the center. A dollop of the cream cheese mixture and a dollop of the pie filling or jam, and they're ready to twirl... I just took every other point and brought them up to the top and then pinched the ends together. Then a quick brush with an egg white bath to make the pastries golden-brown.

The recipe said to put the pastries in the refrigerator now for about 15 minutes. The first batch I did about 10 minutes, and the second batch I forgot completely. I really didn't notice a difference between the two. I imagine you shouldn't leave these sitting on the counter for a long time before baking, but I don't know that it's necessary to refrigerate if you're going straight from prep to the oven.

They came out of the oven beautifully, and all a little bit different. I love how they're obviously pinwheels but yet obviously homemade.

The final step is to drizzle the pastries with a very light powdered sugar & milk glaze. The first batch {my test batch} I skipped this step, and they were still really good. But I will say that adding the glaze made them even better!


Easy Pinwheel Danish

2 sheets (1 box) frozen puff pastry, defrosted
8 ounces cream cheese, at room temperature
6 tablespoons sugar
2 egg yolks, at room temperature
2 tablespoons ricotta cheese
1 teaspoon vanilla extract
1/4 teaspoon salt
Topping: 1 1/4 cups jam or pie filling, any fruit flavor
Egg Wash: 1 egg white beaten with 1 tablespoon water
Glaze: 1/2 cup confectioner's sugar mixed with 2 tablespoons milk

Line baking sheets with parchment paper.

Combine the cream cheese and sugar in the bowl of an electric mixer fitted with a paddle attachment; cream them together on low speed until smooth. Add the egg yolks, ricotta, vanilla and salt; mix on low just until combined. Do not beat. Chill filling.

On a lightly floured surface, roll a sheet of puff pastry into a 12" square. Cut into nine 4" squares. To make a pinwheel, make four 2" cuts from the corner toward the center of each pastry square. Fold every other point in toward the center, pressing firmly.

Place a spoonful of the chilled cheese filling in the center of each square. Top with a spoonful of jam or pie filling. Brush the top of the pastries with egg wash. Refrigerate for 15 minutes.

Preheat the oven to 400°. Bake the chilled pastries for 20 minutes or until deeply golden brown. Transfer to cooling racks. Cool 20 minutes before drizzling with glaze.

Thursday, July 26, 2012

Country Peach Tart

Yes, I realize it's been 5 months since I posted last. :-) That doesn't mean I haven't been baking, it just means I haven't been blogging about it! I've got a bunch of pictures saved up to write about.

I love summer {ugh, not for the weather, especially this year!} - but for the wonderful, fresh produce. I've been enjoying the local farmer's markets and community produce co-ops. Call me crazy, but I would rather eat vegetables than fruit. BUT when we're talking about baking with fruit, now that's a different story! So when I saw beautiful, ripe peaches in the store a couple months ago, I knew I could come up with something to do with them.


I went pretty rustic on the picture-taking this time - but it was just for us here at home. This tart was pretty simple to put together. I used frozen, pre-rolled pie dough, and since there was no pie plate needed, there was also no need for me to fret over the crimping of the edges {my least favorite part of making a pie}. I was a little nervous about folding the crust over the filling and how that would work, but I really just started folding and kept going until I was all the way around, and {in my opinion} it turned out just fine. A delicious summer evening treat!

Country Peach Tart
Recipe adapted from Better Homes and Gardens New Cookbook

1 frozen pie crust
1/4 cup granulated sugar
4 teaspoons all-purpose flour
1/4 teaspoon ground nutmeg
3 cups sliced, peeled peaches (1 1/2 pounds)
1 tablespoon lemon juice
1 beaten egg
1/4 cup almonds

Thaw pie crust as directed on package for a single-crust pie. Line a baking sheet with foil; sprinkle lightly with flour. Roll pastry to 13" circle atop baking sheet.

Mix sugar, flour, and nutmeg; stir in peaches and lemon juice. Mound peach mixture in center of crust, leaving a 2" border. Fold border up over peaches. Sprinkle almonds over the top, if desired. Combine egg and 1 tablespoon water; brush onto the top and sides of the crust.

Bake in a 375° oven for 40-45 minutes or until crust is golden. To prevent overbrowning, cover edge with foil or a pie crust shield the last 10-15 minutes of baking. Cool 30 minutes on the baking sheet. Serves 8.

Wednesday, February 29, 2012

Chocolate-Peanut Mousse Pie

You know how I was 
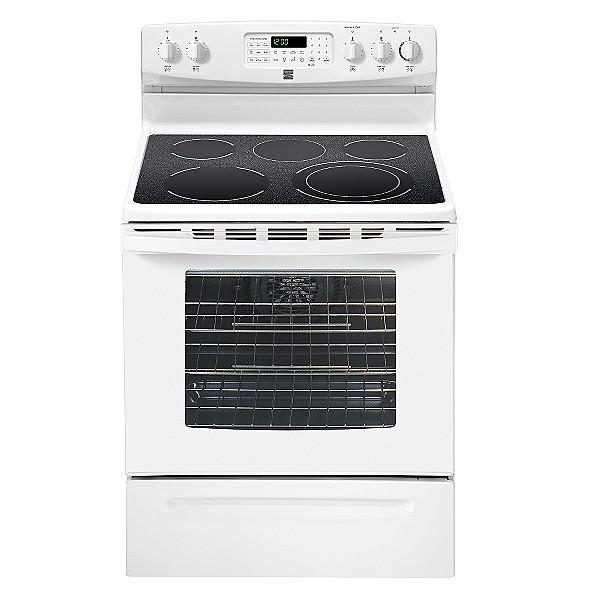
bragging super excited about my new oven in the last post? Well, either God was disciplining me for being so excited over something so material... or when Sears delivered it, they put a hex on the rest of our appliances. Ok, so I really don't believe either of those. But whatever happened, the very next day, our dryer gave out. As in, just wouldn't turn on. We Adam and our neighbor finally discovered that a tiny piece, smaller than the tip of a pencil eraser, had broken off of the timer. The part was ordered, the part came in, and... drum roll, please... it didn't fit. I won't bore you with the details, but after a "nice" conversation with Sears about how their website led us to the wrong part, we are being refunded for the part plus shipping both ways.

Take #2 on ordering the part was successful - it came in last night. However, also last night, as I was entertaining the book club girls, our dishwasher suddenly said "GRRRRRRR." Yep. Just like that. Then "click-click-click" while still doing the "GRRRRR" thing. Honestly, I think it's a good thing we had company, because otherwise I may have found a baseball bat and done some batting practice on our appliances. Not really. But my mind went there.

Imagine my surprise - and relief - when Adam called me at work today {he worked from home today, so he had time to trouble-shoot during breaks} and said that 1) the dryer is fixed and WORKS, and 2) he turned on the dishwasher and there were no weird sounds coming out... he thinks maybe some food got stuck in the gears and it worked its way out. Crossing fingers!

So do I dare talk about my oven again? How evenly it bakes? How much I love it even though I haven't even begun to use all of the features? Nope. I better just stick to the recipe. Here's what I made:

Not a great picture, I'll admit. The book club girls and I - and then my husband and daughter - devoured it, and this was all I had left for a picture. It was delicious. Not to sweet, but very rich. And really not that difficult, just a little time-consuming.

The crust is made with chocolate graham crackers, something I had never bought before, or had even noticed in the store until now. Usually chocolate crusts call for crushed Oreo's, but I like the taste of this much better. Not nearly as sweet since there is no sickly-sweet white filling.
The crushed graham crackers are mixed with a little bit of sugar and butter, then pressed into the pie plate and baked for just a few minutes. Next comes a yummy chocolate and peanut layer. I really liked how this turned out - sometimes I've made pies that have a bottom layer, and it ends up being really difficult to cut. But this chocolate layer stayed soft and easy to cut through, maybe because of the whipping cream in it. {Did I tell you that the entire pie has almost 4 cups of whipping cream in it? Oh my.}
For the filling, you melt down peanut butter chips, again into some whipping cream. Then you take MORE whipping cream and whip it up into soft peaks and softly fold it into the peanut butter mixture. It was so light and fluffy, despite how rich it tasted.
Then comes one more layer of the chocolate and peanut mixture. As a final step, I spooned more of the filling around the edge for presentation. This was actually the most frustrating part. I was going to pipe it on using a decorating bag and tip. But for some reason, the texture of the filling made it just deteriorate the bag {I use the disposable wax-paper-like ones}. At first I thought the tip I was using was too small, so I tried again. And again. And again. Until the entire thing blew up all over my arm and shirt. At that point I gave up and decided that spooning it on was good enough for me. I imagine if I would have used a reusable bag it would have worked out just fine.

Chocolate-Peanut Mousse Pie
From Recipe.com

1 1/4 cups crushed chocolate graham crackers
3 tablespoons sugar
1/3 cup butter, melted
3 3/4 cups whipping cream
4 ounces bittersweet chocolate, finely chopped
1 cup chopped peanuts
1 1/3 cups peanut butter flavored pieces

For crust, combine graham crackers and sugar; stir in butter. Spread onto bottom and up sides of a 9" pie plate. Bake in a 375° oven for 5 minutes; cool.

Meanwhile, in a saucepan, combine 3/4 cup whipping cream and the chocolate. Stir over low heat until mixture is smooth. Stir in 3/4 cup peanuts. Pour half othe chocolate mixture over crust. Place in freezer and chill about 20 minutes or until set, then place in refrigerator. Cover and refrigerate remaining chocolate mixture.

Meanwhile, in another saucepan, combine 1 cup of the cream and the peanut butter pieces. Stir over low heat until mixture is smooth. Chill in refrigerator until cool but not stiff, stirring occasionally.

In a chilled bowl, beat remaining 2 cups whipping cream with chilled beaters on medium speed until soft peaks form. Fold about 1/3 of the whipped cream into the peanut butter mixture; gently fold in remaining whipped cream. Spoon 2 1/2 cups of the mixture over the chocolate in crust. Place in freezer for 15 mintues or until set. Cover and refrigerate remaining peanut butter mixture. Spread remaining chocolate mixture over peanut butter mixture. Pipe or spoon remaining peanut butter mixture around edge of pie. Sprinkle with remaining nuts. If desired, garnish with cocolate curls. Chill at least 4 hours or overnight.

Thursday, February 23, 2012

Crescent Rolls

Look what I made. Me. Miss "I-Can't-Bake-Bread-Because-I'm-Afraid-of-Yeast."


Ok, I realize that those of you who are good with bread are wondering what the big deal is. But for me, I just keep looking at this picture thinking how beautiful they are and still not believing that they came out of MY oven.

Granted, I did make the dough in a bread machine. Is that cheating???

And I did just splurge on a new oven:

Fabulous. But surely I can't give the oven all of the credit, right?

I'm taking baby steps. I'm still proud of myself. They were delicious.

Crescent Rolls (2 pound recipe)
Recipe from Better Homes and Gardens Bread Machine Baking

2/3 cup milk
2 eggs
1/3 cup butter, cut up
3 3/4 cups bread flour
1/4 cup sugar
1 teaspoon salt
1 1/2 teaspoons active dry yeast or bread machine yeast
3 tablespoons butter, melted

Add the first 7 ingredients to a bread machine according to the manufacturer's directions. Select the 2 pound dough cycle. When the cycle is complete, remove dough from machine. Punch down. Cover and let rest for 10 minutes.

Divide the dough into thirds. On a lightly floured surface, roll each section into a 12" circle. Brush each circle with melted butter. Cut each circle into 8 wedges. Starting at the wide end of each wedge, loosely roll toward the point. Place rolls, points down, 2-3" apart on greased baking sheets. Cover; let rise in a warm place for 30-40 minutes or until nearly double.

Bake in a 375° oven for 8-10 minutes or until golden. Remove from baking sheets; cool on wire racks.

Thursday, February 16, 2012

Mickey Mouse Clubhouse Birthday Cake

I'm going back in the archives today. I was going through some of my pictures, organizing them and {finally!} backing them up to "the cloud" - wherever that is - still not sure - but I feel like I sound really smart when I talk about the cloud, and now I can officially say that I use it, too.

Anyway, I came across pictures from Olivia's 2nd birthday. It was the last birthday where I got to choose the theme... now I'm afraid I'm destined to throw princess party after princess party after princess party. Which is fine, but I'm sure glad I threw one non-pink party while I had a chance! My choice was... Mickey Mouse Clubhouse!


This cake was so much fun to make. I took a day off work so I could work on it without a little helper, and so there would be a big surprise on birthday morning.


I baked a basic 8x8" square cake for the base. Then for the clubhouse, I used the small Pampered Chef Small Batter Bowl as my baking pan - yes, it can go in the oven!


The head and ears are made from styrofoam balls. I found some food spray paint and went through at least 3 cans of it, just to coat the white enough. Then I used dowel rods to hold the ears on and support the head onto the clubhouse. A couple of figurines from the party store and a #2 candle finished it off!

Thursday, February 9, 2012

Caramel Nut Sticky Biscuits

Caramel, pecans, biscuits... sounds like the ultimate breakfast, right? Well, I won't say they weren't good. But I will say that they were better the next day. You know how some things just need to sit around a while before they get the right taste and textures? I think the biscuits were too crumbly right out of the oven, and once they had a chance to set and soak all that caramelly goodness in, that's when they hit the spot for me.
Enough critiquing. Let's get down to the good stuff. Start with brown sugar, corn syrup, butter and a little bit of cinnamon, and it goes into the bottom of a greased pan. Then you chop up some pecans {YUM}, however fine you like them, and sprinkle them on top.
I could just stop right there. That's always my favorite part to sticky buns - the sticky part! But then you make the biscuits. It's a really simple biscuit recipe, with a twist since there's oatmeal and cinnamon in the dough.
Pat it down to just smaller than the size of your pan...
...and then cut it into 16 squares. Place the squares on top of the caramel mixture and bake. The only thing left is to invert the biscuits onto a serving platter and enjoy!

Caramel Nut Sticky Biscuits
adapted from Ebenfeld Mennonite Brethren Cookbook

Topping:
2/3 cup packed brown sugar
1/4 cup light corn syrup
1/4 cup butter, melted
1/2 teaspoon cinnamon
1 cup chopped pecans

Biscuits:
1 cup all-purpose flour
1 cup whole wheat flour
1/4 cup sugar
1 tablespoon baking powder
3/4 teaspoon baking soda
1/2 teaspoon salt
1/2 teaspoon cinnamon
1/3 cup butter
1 cup buttermilk or sour milk {I used buttermilk powder and water}

For topping, combine the first four ingredients; mix well. Spread into bottom of 9x9" greased pan. Sprinkle with nuts. Set aside.

For biscuits, combine dry ingredients; mix well. Cut in butter until crumbly. Stir in buttermilk and mix until moistened. Knead gently on floured surface 5-7 times. Pat into 8" square. Cut with knife into 16 squares. Place over topping in pan. Bake 20-30 minutes at 375° until golden. Let stand 2 minutes. Invert onto large platter.

Saturday, January 21, 2012

Apple Pancake Rings

First, I would like to apologize for the quality of these pictures. I made these on the morning of the birthday party {see previous post} and needless to say, the morning was a bit rushed. I was lucky I remembered to take pictures at all!
I wanted to make a special breakfast the morning of the party, but it needed to be something quick. And I also wanted it to be semi-healthy, since I knew that lunch would consist of PB&J sandwiches and cake - yes, there was also fruit at the party, but I know my daughter well enough to know that those would be left on her plate - and they were.

I looked in the fridge and saw... apples! My mind went to an idea I found and pinned just a few days ago, Fried Apple Pancakes.
I peeled and cored a couple apples {I LOVE my Pampered Chef apple corer!} and sliced them into 1/4" rings.
Then I whipped up a simple pancake batter, and Olivia had a lot of fun dipping the apples in the batter. {Of course the princess dress had to be worn first thing in the morning, and the hair didn't get combed until much later in the morning.}
I stuck the batter-covered apples in a small frying pan and cooked them up just like I would do with pancakes... and voila! Olivia not only helped me make it, she also gobbled up a breakfast with fruit in it! {How sneaky am I?}
Don't you know that bracelets have to accompany breakfast? Ha!

Apple Pancakes
Simple Pancake Stack recipe taken from Pancakes and Waffles by Kate Habershon

2-3 baking apples
1 1/2 cups all-purpose flour
2 1/2 teaspoons baking powder
1 teaspoon salt
3 tablespoons sugar
1 cup milk
3 eggs
4 tablespoons unsalted butter, melted and cooled

Peel, core and slice apples. Set aside.

Stir together flour, baking powder, salt and sugar into a bolw. Put the milk, eggs and cooled melted butter into a second large bowl, then mix with a wire whisk. Add the dry ingredients and beat gently to make a thick batter. Be careful not to overwork the mixture - it does not have to be smooth.

Heat a griddle or skillet over medium heat. Reduce the heat. Dip the apple slices one by one completely into the pancake batter. Cook in batches of 3-4 at a time, flipping to the other side once the underside is golden brown. Serve warm with maple syrup.

The original recipe called for a little cinnamon in the batter, which I think would have been a great addition. I honestly didn't even see that part of the recipe until after they were all gone. It also uses reduced apple cider as the syrup instead of maple syrup. Sounds delish but I didn't have any on hand, and we were short on time. Next time I'll definitely be trying that!